


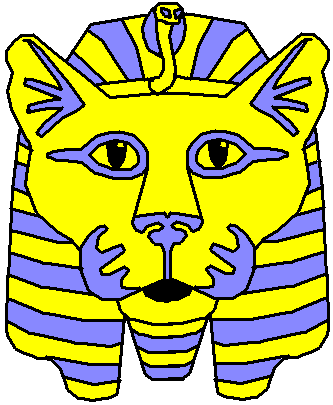
Pharaoh Cat Vase
Do you like to paint and glue stuff together? Why don't you visit the crafts page for some new ideas and inspiration?
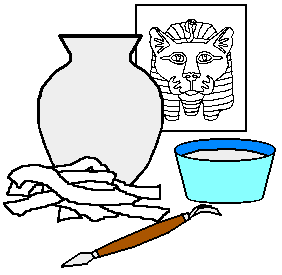
Materials
- Leather-hard Greenware Vase
- Pharaoh Cat Printout (of appropriate size)
- Cleaning Tools
- Cheese Cloth (cut into strips)
- Slip (same as used for vase)
- Damp Sponge
- Ez-stroke Underglaze in gold, blue, and black
- Clear Glaze
- Glaze Brush
- Smaller brush (for Ez-stroke)
Part 1: Making the Pharaoh Cat Vase
1. First you will need to choose a vase that appeals to you and print the Pharaoh Cat up to a size that fits well on the piece. It should fit the vase so that it almost fills one side of it (width wise). The vase needs to be leather hard so make sure the person pouring it knows that. If the vase is too dry the cheese cloth "bandages" will fall off. Clean the seam lines off the vase and wipe it down with a damp sponge before you begin.
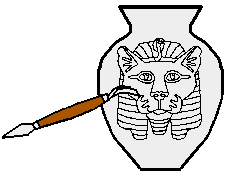
2. Now you will need to either draw or trace the cat onto your vase. One of the ways you can trace it, is by holding the paper against the vase and using a firm pressure to draw along the lines with a pen or pencil. Because the clay isn't dry it should make enough of an impression for you to see the lines. Once you have the lines drawn in, use a sharp cleaning tool to carve the lines into the vase. You want to make nice visible lines, but you don't want to stab right through the piece.
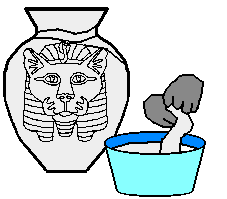
3. Once your cat is carved on your ready to start the fun part. Pour your slip into a shallow dish of some kind and then dip in your first piece of cheese cloth. The cloth needs to be covered by the slip but scrape off excess with your fingers. Then spread the strip onto the vase and get the next one. Cover the vase around the cat face with the strips of cheese cloth, don't be afraid to overlap and play with it. The strips can go in all different directions or just one, its up to you. Keep the piece damp while your working on it. When the piece is fired the cheese cloth will fire out, and leave just the clay behind.
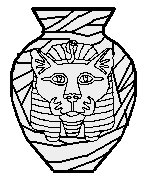
4. Now allow the vase to dry completely. Once its dry, fire it at the appropriate temperature (follow the instructions for the slip you are using). Thats it, your done part one.
Part 2: Decorating the Pharaoh Cat Vase
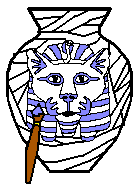
1. Now that the vase is fired, you need to glaze it. Using the appropriate colors of Ez-stroke, paint in the cat face. If your feeling daring try high-lighting the raised areas with lighter shades of Ez-stroke. Be careful not to get it too thick, it will pop off when its fired if you do. Now allow the vase to dry. (I'm keeping the glazing in these instructions pretty plain, but feel free to try your own thing or use one of my other suggestions.)

2. Now you have a choice, you can either put the clear glaze (follow the directions on the label) on now, or fire it as it is and put the clear glaze on for a third firing. Many people have less trouble with smudging the Ez-stroke if they fire their pieces before covering the entire thing in clear glaze. Don't forget to roll glaze on the inside of the vase as well. The bandages in this example will just be off-white because the only thing on them is clear glaze. A semi-transparant colored glaze (light brown, or grey) on the bandages might also look nice because it would high-light the texture.
3. Once you have glazed and fired your piece, your pretty much finished. There are only two other things you might want to consider. One, is using a fired gold product on the gold areas of the mask rather than just plain Ez-stroke. Just follow the directions on the bottle. The other thing, is to make sure any sharp points, caused by stilting, on the bottom are ground off. Your done!